There are a great many applications and utilities for resizing images, but none that I’m aware of provide the unique functionality of ClipResize.
Why does the world need Yet Another Image Resizer? I use screencaps a lot. I grab things to put into my notes, into emails, and into documentation. The captured images, however, are very often too large for my purposes, especially since the advent of Retina displays and high-megapixel cameras - who wants to get an email with a 4,000-pixel-wide embedded image? This has in the past necessitated countless side trips to Photoshop to resize whatever's on the clipboard: switch to Photoshop, New Document, Paste, change Image Size, Select All, and Copy. Whew! Sure, I have keyboard and/or Touchbar shortcuts for all these actions, but it’s still a pain. Finally I broke down and wrote this utility (in Xojo) to make the process easier.
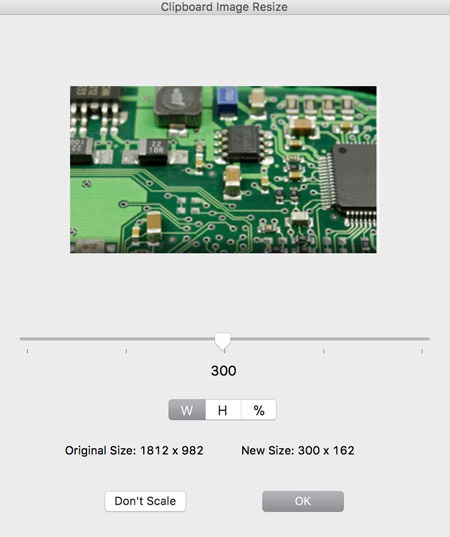
When ClipResize is launched, it presents a window with a size slider, scaling mode selector, size info displays, and a preview area that shows the post-scaling size and quality. A cubic resampling algorithm helps maintain quality. Three resize modes are offered: fixed width, fixed height, and fixed percentage. I generally use fixed width. ClipSize remembers the last mode and size used, so most of the time nothing will need to be entered or touched. The maximum width and height values are fixed at 600 pixels, because that’s pretty much as big as I ever need; if there’s demand for other mximums I may make this a user-settable preference in the future.
There are four ways to exit ClipResize:
- Enter or Return will execute the selected scaling operation, put the resized image on the clipboard, then quit.
- Escape will quit, leaving the image on the clipboard untouched.
- Selecting Quit from the application menu or hitting cmd-Q will also quit without affecting the image on the clipboard.
- Changing to another application, by any method, will execute the selected scaling operation, put the resized image on the clipboard, then quit. just as Enter or Return, thus eliminating another keystroke.
After dismissing ClipResize via one of the above, you can go directly to your emai or other program and paste the image.
“That’s kind of neat, but no way I’m going to remember and dig out a utility every time I do a screen cap to the clipboard, nor am I going to waste precious Dock space on it”, you say, and I fully agree! But combined with a keyboard macro or other automation utility to launch both the screen grab and resize functions, it becomes a completely transparent and natural extension of the OS - the workflow can becomes as simple as
Hotkey / Select screen area / Hotkey for the target app / Paste.

There are many hot-key tools out there, and this can probably be done with Apple’s built-in Automator utility, but since I use the wonderful BetterTouchTool for other stuff, I use it for this as well. I activate screen cap with the key combination ctl-option-cmd-C; it’s easier to press than it sounds, and easy to remember. In BTT I configure this combination to trigger a "predefined action", to wit, run the following AppleScript "in the background” - if you don’t run it in the background, the capture won’t happen the first time you drag and release the selection:
on run
do shell script "screencapture -i -c"
do shell script "open /Applications/ClipResize.app"
return
end run
Don’t forget to actually put ClipResize at the location the shell script is looking at. Also note that you may need to open System Preferences - Security in order to grant permission for the app to run the first time you launch it.
ClipResize is free, you can download it here. The current version is 3.0.