The Cymbal Editor Window
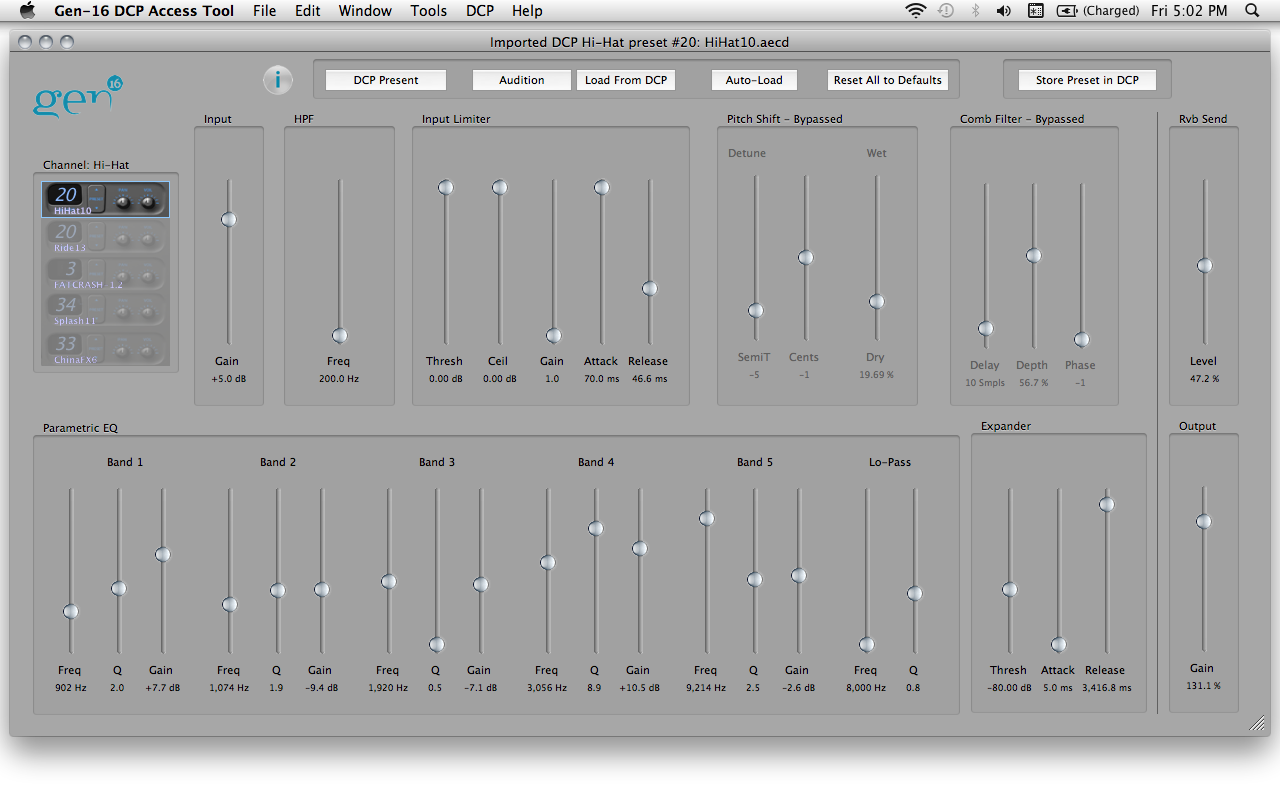
When a cymbal preset file (*.aecd) is opened in the DCP Access Tool it will open in a Cymbal Editor window. A Cymbal Editor Window allows adjustment of all the DSP parameters of one cymbal preset. It also acts as a "remote control" for the DSP in that any changes to the on-screen controls are transmitted to the connected DCP (if any) in real time so that DSP adjustments can be previewed "live", and it can remotely select DCP presets and solo DCP channels.
So that the screen display always corresponds to what you're hearing, the current hi-hat preset will be automatically imported and displayed when a new Cymbal Editor is opened by selecting File->New->Cymbal Preset.
Here's what a cymbal editor window looks like - click the image for a high-resolution version
Before jumping in with cymbal DSP adjustments, it might be useful to take a look at the Cymbal Processor's DSP system block diagram:
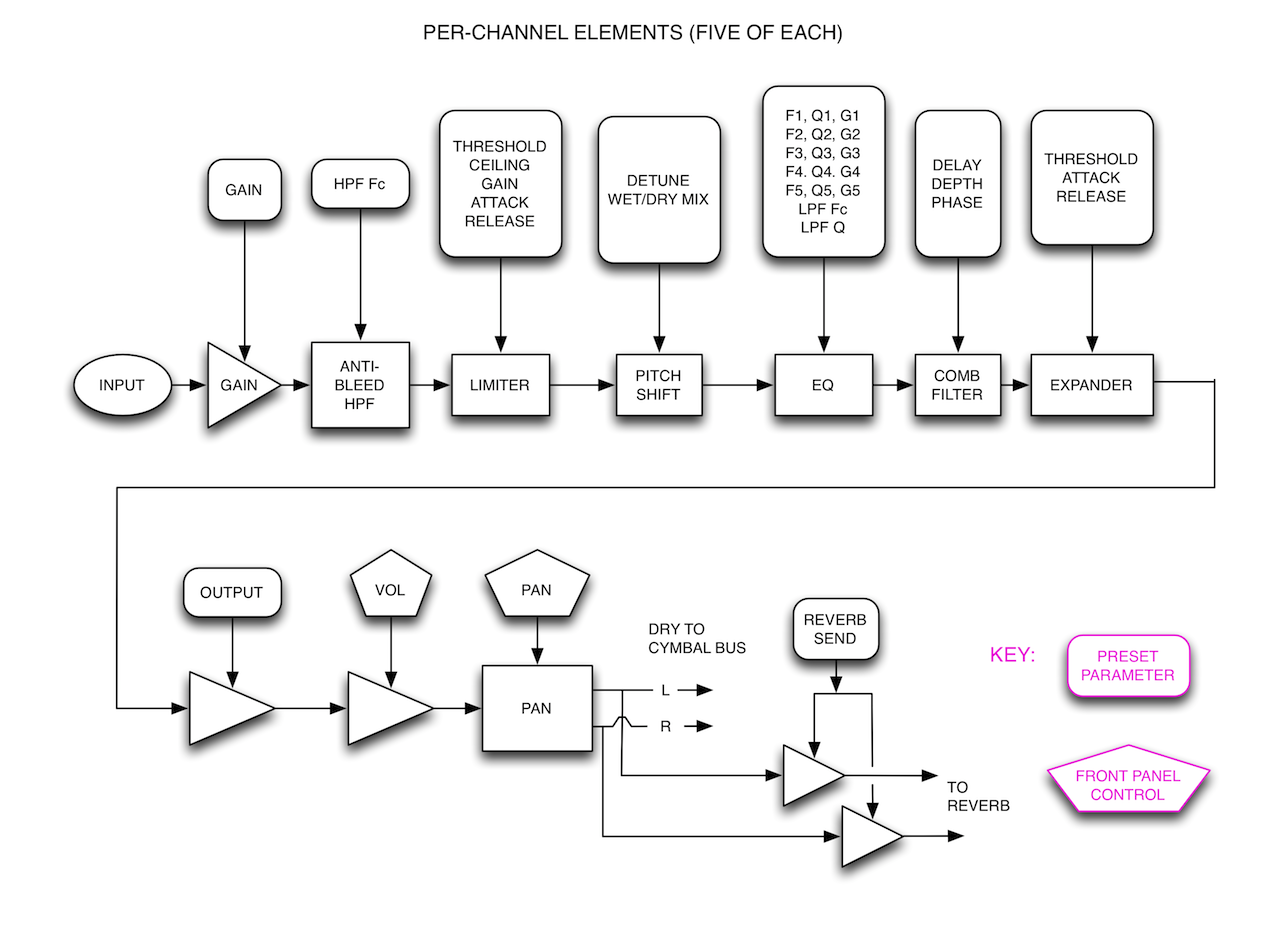
Each of the parameters listed in the round-cornered boxes of the block dIagram has a corresponding slider control in the editor window.
The parameters shown inside the pentagonal boxes are adjusted via the DCP's front-panel knobs and do not have values stored in the preset data.
Cymbal Editor Window Controls
In addition to the sliders for controlling DSP parameters, the Cymbal Editor window includes controls governing its own operations. These are shown here:
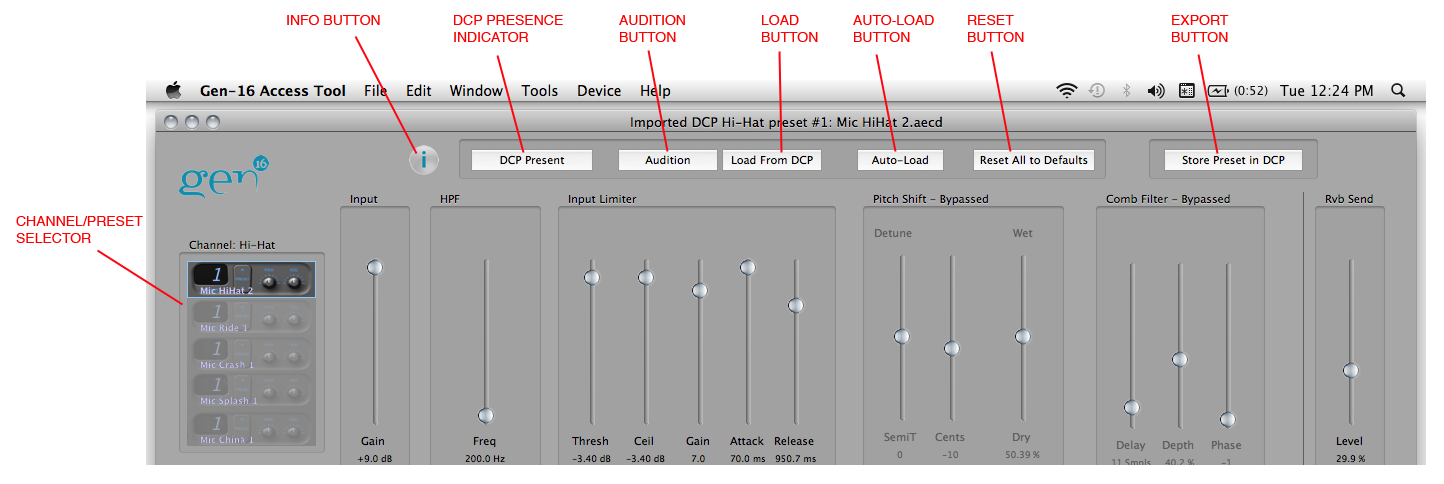
Info Button
Clicking the Info Button opens a drawer window showing various bits of information about the preset, and also offers a "description" field in which you can enter comments about the preset. These comments are saved with the preset's information when saved to disk, but are not written to the DCP's memory when the preset is exported to the DCP.
DCP Presence Indicator
If this control is "grayed out" it means that the program is not aware of a connected DCP. If your DCP is in fact connected and this control does not become active, try unplugging and re-plugging your USB connection. When the Presence Indicator is active, clicking on it will open the Device Info window.
Audition Button
The Audition Button sends all of the DSP parameter values as determined by the editor window's control settings to the DCP so that the preset can be auditioned. Initially this may seem redundant since each parameter value is sent to the DCP "live" in real time as it is adjusted, but it is in fact an essential function for comparing preset sounds between different editor windows or between an editor window and a preset stored in the DCP.
Load Button
The Load Button fetches all the DSP parameters from the currently-selected preset of the currently-selected channel and sets the on-screen sliders correspondingly. This is useful when you've changed some sliders and then want to revert to the DCP- stored preset's settings.
Auto-Load Button
The Auto-Load Button causes all the DSP controls in the editor window to "track" or "follow" the DCP's stored preset values as the DCP's buttons are pressed or as presets are scrolled using the Channel/Preset Selector control. This is a great way to quickly and visually see the preset DSP settings stored in the DCP. When editing or creating your own presets, however, it should be used with caution, since pressing the DCP's preset select button for the currently-selected channel or changing the current channel's preset via the Channel/Preset Selector control will overwrite whatever settings are in the editor window.
Note that auto-load operates only on the currently-selected channel; changing the current preset on channels other than the currently-selected channel will not cause auto-load to happen.
Reset Button
The Reset Button sets all the DSP parameters in the editor window to their default, "most sonically neutral" positions. To reset a single control to its default value, option/alt-click the control. To reset all the parameters in one DSP processing block to their default values, option/alt-click the block's title.
Export Button
The Export Button allows you to store the preset to the DCP's internal flash memory. A dialog will be presented where you can select which channel and preset number to store it to. You can only overwrite an existing preset, you cannot append or insert a new preset via this button. To append, insert, or delete presets the Set Editor must be used to create and export a new set of presets. The Export Button performs the exact same function as selecting "Export Preset(s) to Cymbal Processor" from the File menu. See "Exporting Presets to Your DCP" for more information.
The Channel/Preset Selector Control
The Channel/Preset Selector performs a number of functions:
Preset Name Display
The Channel/Preset Selector displays the number and name of the currently-selected preset in each channel of the DCP. If the preset has been modified by movement of any of the sliders or changing any of the Bypass controls the name will be displayed in red text. If the preset has not been modified and the displayed settings correspond exactly to those currently stored in the DCP's flash memory, the name is displayed in white text. The preset name will revert to white whenever the Load button is pressed or whenever a preset is changed while Auto-Load is on, since under those conditions the screen settings will necessarily match the stored preset's settings.
Channel Selection
Change the channel selection by clicking on the desired channel or by scrolling with the keyboard up/down arrow keys.
The Channel/Preset Selector determines the "target" channel for any adjustments made to the DSP controls. For instance, if the Channel/Preset Selector is set to Ride, moving any of the DSP parameter sliders will affect the sound coming through the Ride channel and will not affect the sound of any other channels.
The Channel/Preset Selector also determined a cymbal preset's "Nominal Channel" when it is saved to disk. While any preset can be stored in any of the five DCP cymbal channels, the "Nominal Channel" is provided to help you remember which cymbal you designed a particular preset for. When a cymbal preset is opened from disk, the channel selector will automatically go to the preset's nominal channel. When a cymbal preset is loaded into a Set Editor window, its nominal channel will be shown in the list's "Nom Ch" column. When a cymbal preset is auditioned by double-clicking its name in a Set Editor window list, it will audition on its nominal channel if the "Audition Channel" is set to "Preset Nom".
Preset Selection
The Channel/Preset Selector can remotely change the preset selections in the DCP, a very convenient feature for auditioning various presets without having to use the DCP's own keypad. Change the preset of the currently-selected channel by pressing the left or right arrow keys on your keyboard.
Soloing
Any one of the five DCP channels can be soloed by pressing the Return key on the PC keyboard. The soloed channel's preset number will be displayed, flashing, and the un-soloed (i.e. muted) channels will show "--". While solo is active, pressing the up or down arrow keys on the PC keyboard will change which channel is soloed. The soloed channel's preset can be changed as usual by using the left and right arrow keys. To exit solo mode, press Return again.
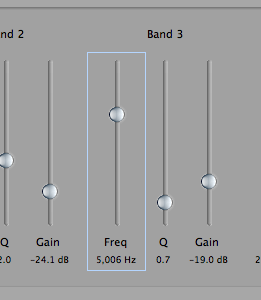
Parameter Sliders
The parameter sliders can be moved by clicking and dragging, or by hovering the mouse over the slider track and using your mouse's scrollwheel or trackpad scroll gesture. When you click on a slider, a "focus ring" is shown around that slider, indicating that it has the focus:
While a slider has the focus, it can be adjusted by scrolling (via mousewheel or trackpad) anywhere on the window. This is convenient when you're adjusting a parameter while hitting a cymbal at the same time - you don't have to keep the mouse cursor exactly on the slider.
Futhermore, while a slider has the focus it can be adjusted in fine increments by using the PC keyboard's up or down arrow keys. This is very useful for fine adjustments, especially to the parametric EQ, where small changes can have a big effect on cymbal sound.
To clear the focus from a slider, do one of the following:
- Press the Escape key on your PC keyboard.
- Click anywhere in the window that's not a slider.
- Click on another slider, which will give the focus to that slider.
- Move the mouse cursor over the Channel/Preset Selector.
Group Box Controls
You may have noticed that each DSP processing block's controls are contained within a "Group Box", like the Limiter shown here:
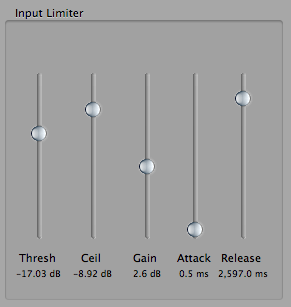
While these Group Boxes provide important visual cues about functional grouping of controls, they are also controls in and of themselves! Clicking on the title of a group box will bypass the entire DSP block (the DSP block will not process the cymbal sound) and its bypass status will be shown like this:
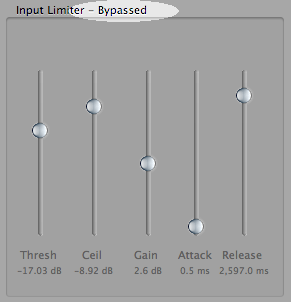
The control captions in a bypassed DSP block will be "grayed out" and the controls inoperative. To "un-bypass" a DSP block just click on its title again.
Option/Alt-clicking a groupbox title resets all the controls within that block to their default values.
Cymbal Editor DSP Parameters
Following is a description of each DSP block and its controls. A brief description will also appear on-screen at the mouse cursor if "Show Tooltips" is checked in the Help menu.
Input Gain
This is the first DSP operation performed on the signal from the cymbal pickup, and it is simply a level control.
HPF
The second block in the signal chain is a high-pass filter. Setting its cutoff frequency higher will block more low-frequency content.
Input Limiter
We won't go into detail here about how compressor/limiters work but if you need to brush-up here's a good introduction: http://audio.tutsplus.com/tutorials/mixing-mastering/a-beginners-introduction-to-limiters/. Note that the Ceiling and Threshold controls are linked such that Ceiling can never be set lower than Threshold. When reducing the Ceiling level, the slider will stop at the Threshold level, and when increasing Threshold, the Ceiling slider will be dragged along with Threshold as soon as Threshold reaches the Ceiling slider's level.
Pitch Shifter
The Pitch Shifter block is capable of very dramatic and interesting alterations of cymbal sounds but is accompanied by some limitations and caveats. Firstly, if you're using the original Gen-16 acoustic mic pickups, be aware that any bleed coming through a channel that has pitch shift applied is also going to be pitch shifted. So if you've got vocal monitor coming through your cymbal pickup, your vocals are going to sound a bit strange! For this reason, pitch shifted presets are probably best reserved for studio use. This is of course not an issue if you're using the Direct-Source™ contact sensor, which picks up only the cymbal it's attached to. Secondly, while we have done our utmost to minimize latency in all the DCP's DSP, there is a bit of audible latency in the pitch shifter block. Nonetheless, the pitch shifter can be pretty awesome under the right circumstances.
5-Band Parametric EQ
This block is the heart of Acoustic-Electric Cymbal tone shaping, and should be pretty self-explanatory. if you're using the original Gen-16 acoustic mic pickups, go easy on Q and Gain or feedback may occur. Feedback is not an issue if you're using the Direct Source™ sensors. Small changes in frequency and/or gain can dramatically alter the sound; using the up/down arrow keys to control the sliders will yield the finest degree of parameter control.
Comb Filter
This deceptively simple DSP block is very useful in introducing subtle tonal variations in cymbal sounds.
Expander
This downward expander block can be used as a traditional noise gate, or at more extreme settings, to get deliberately "gated"-sounding effects.
Reverb Send
Each channel's reverb send level is set on a preset-by-preset basis. The overall reverb return level of the whole system is set by the DCP front panel Reverb knob. Although this control is shown in the middle of the signal chain in the editor window, it is actually at the end, after all other processing blocks.
Output
Each channel's overall ouput level is set on a preset-by-preset basis in order to normalize the volume of the various presets. This is the final DSP block, after all others (but before reverb send).
See also: Editing Presets